It seems extravagant, but Chicken Cordon Bleu is basic ingredients transformed with a little art and a little skill. Not too much skill, though, and I’ll walk you through it.

Chicken Cordon Bleu

Chicken Cordon Bleu is a fave of my son’s, and never fails to bring him to the table. He’s never asked if one of his for dinner when I make this, and I think it’s because he doesn’t want to share!
About Chicken Cordon Bleu:
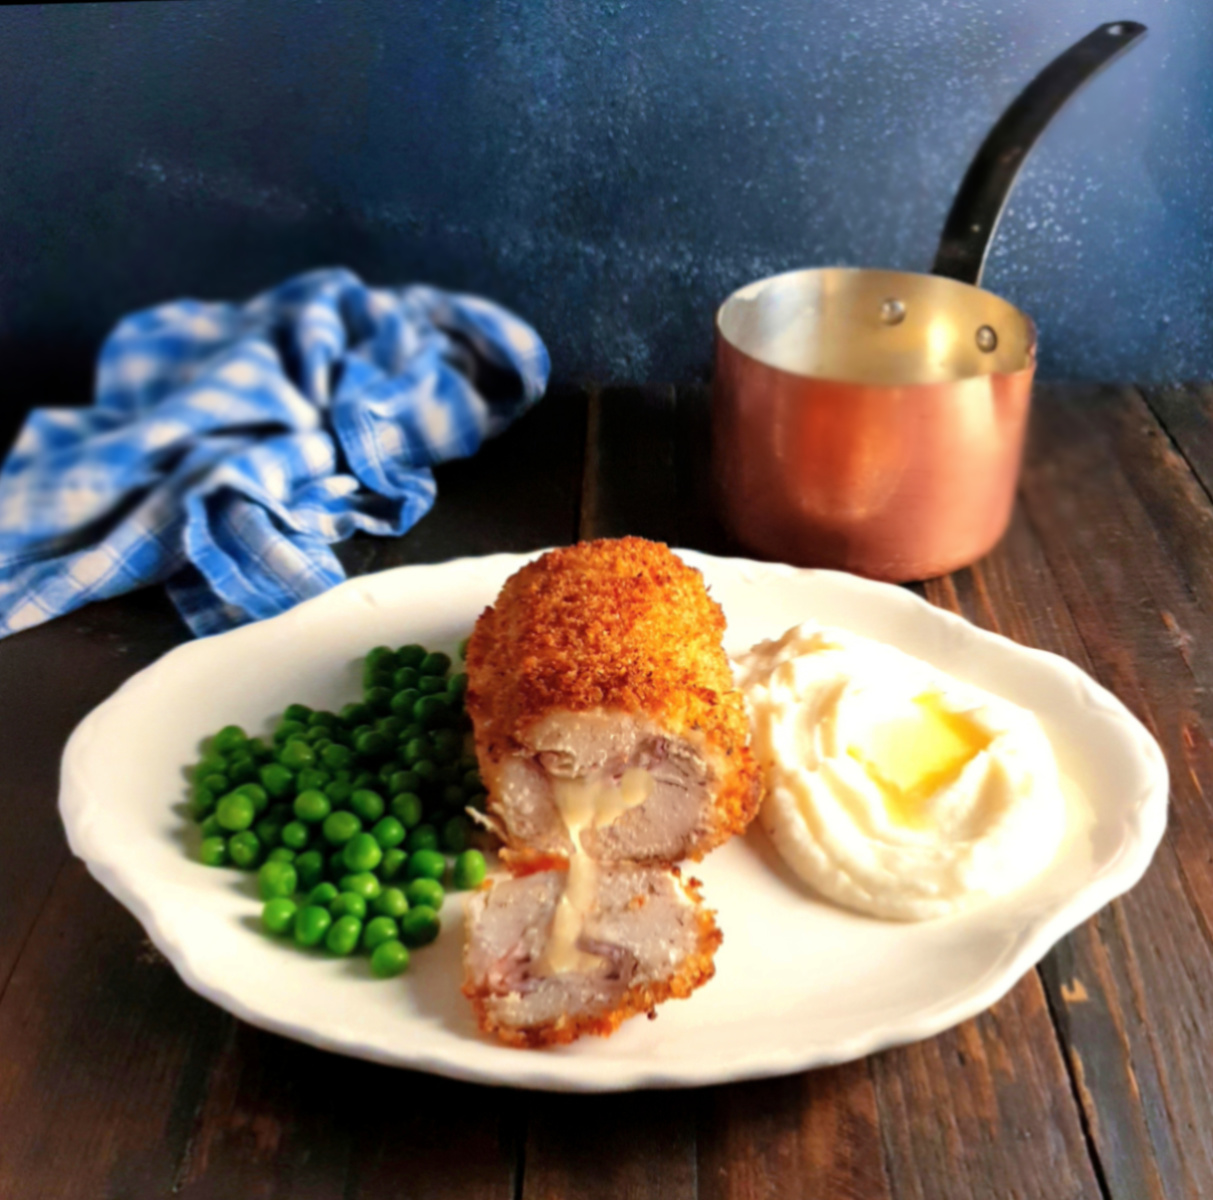
Cordon Bleu is a chicken breast stuffed with ham and gruyère, rolled up, then breaded. Once baked or fried, the cheese oozes as it’s sliced, all smooth and so fragrant, the crust is a crunchy contrast, and the ham? Just added flavor. It’s soooo delish!
Chicken Cordon Bleu is named after the culinary school. It was all the rage in the 70s, along with Chicken Kiev, French Dips, and Beef Shish Kabobs (with wild rice pilaf, of course!) Thinking about it is enough to make me want a Shirley Temple!

Chicken Cordon Bleu with Supreme Sauce
Making Chicken Cordon Bleu:
The recipe needs to be done in stages, which makes it doable, and there’s some downtime. It’s best if stuffed and rolled ahead, then chilled; that helps the chicken seal together. After it’s breaded, it’s chilled again so the crumbs adhere.
Slicing the Breasts:
Slicing is counterintuitive. Start on the fat side, slicing toward the thin side. This way, you avoid a piece of chicken that looks like a heart with two tails.
Stop slicing with about a good inch left. Open it up like a book. Trim off the narrow bottom and make a series of small, shallow cuts vertically along the fat middle portion. This will help when it’s time to pound the chicken out.
Pounding:
Place breast in a heavy Ziploc (best) or between sheets of plastic wrap. It contains the mess and helps the chicken slide as it is pounded, lessening the risk of tearing.
Using the flat side of a meat mallet, gently pound to about a 1/4-inch thickness. Coax it into a rough rectangle as you pound. Be careful around the center area where the cuts were made and any areas where there is a natural seam, like around the tenderloin.
Fill & Roll:
Start with the long side parallel to you. Add two thin slices of ham, leaving a good 1/2″ all on three sides and a bit more at the long side furthest away.
Add cheese over the ham. Bring the bottom of the chicken up and begin the roll, rolling towards the top, while at the same time, bringing in the sides, just like a Chipotle burrito. It might look a little rough; that’s ok.
If any ham or cheese is sticking out, unroll a bit and poke them in; the goal is to have chicken sealed against chicken. Squeeze gently to help seal and turn seam side down.

Preparing Chicken Cordon Bleu
Shape the Chicken:
Lay the chicken on a rectangle of plastic wrap long enough to extend several inches past the chicken, again with the long side in front of you. Add chicken in the center, seam side down, horizontal to the longer edge. Roll the plastic wrap around the chicken, leaving the short sides of the chicken roll open.
Grab a hold of the plastic wrap on each side and firmly roll the chicken on the counter, allowing the plastic to tighten. Pick it up and reroll several times, still holding the ends of the plastic. The plastic will tighten and force the chicken into a nicely rounded and uniform “log” shape.
Refrigerate for at least an hour, and up to overnight, before breading.
Breading:
Prepare the three-step breading process described in the recipe. Set out a rack above a dish or tray for the breaded chicken. Homemade bread crumbs, lightly toasted, are best.
To prevent leaks, make sure the coating adheres at each stage. Pay attention to the sides and seams and “touch up” areas as needed. When adding the breadcrumbs, gently press to help them stick. Place on a rack and refrigerate for at least an hour.
Serve With:
- For a vegetable, these Glazed Carrots with Parsley Butter are a budget option. Simply Steamed Broccoli or Green Beans would be fab.
- Wild Rice Pilaf is great, takes longer to pull off w/o an Instant Pot. Before I started making the IP version, whenever I cooked Wild Rice, I’d make extra and pop it in my freezer.
- If serving with Supreme Sauce (it’s the classic sauce, shown in the pics), mashed potatoes are the way to go.

Instant Pot Wild Rice Pilaf
Leftovers:
Leftover Chicken Cordon Bleu loses some of its charm. Place leftovers in the fridge in an open container and cover once cooled. Will keep for three to four days. Reheat in a 350-degree F. oven for best results.
If You Like Chicken Cordon Bleu, You Might Like:
- Feta and Spinach Stuffed Chicken Breast – this recipe has a fun tying method.
- Feta and Herb Stuffed Chicken Breasts – fabulous and so flavorful.
- Spinach Artichoke Stuffed Chicken – easy and delish!

Spinach Artichoke Dip Stuffed Chicken Breasts
Saving Money on Groceries:
What you pay for groceries depends on not just WHERE you shop, but WHEN. Be strategic and stock up at rock-bottom prices.
- The best sales are before holidays; check out Win at the Grocers. Think beyond the occasion & use the opportunity to stock up at a low for the coming weeks to months.
- If available, take advantage of discount stores like Aldi or Lidl. The pricing at Buyer’s clubs is not always the lowest, but can trump in quality. Be selective when shopping there.
Boneless Skinless Chicken Breast or Thighs:
There are options when it comes to purchasing boneless, skinless chicken breasts (and thighs, too). Generally, buying in larger amounts means you’ll pay less per pound.
- Chicken drops to a low once a quarter. Know the pricing in your area, what’s a good deal, and a great one, and never pay full price. Stock the freezer at rock bottom. Divide family packs into amounts for meals.
- Take it one step further and reduce today’s huge breasts into actual serving sizes. Large ones can be cut in half, and smaller ones trimmed to size. Package trimmings for stir-fries, casseroles, chicken strips, and so on.
- Compare sale pricing at all the available stores, and fresh to frozen. Frozen is often priced in ounces; learn how to compare to fresh, priced by the pound. Unless it’s a great sale, frozen is often more per pound than fresh on sale.
Grocery Cheese:
- Grocery Store Cheese is a great item to pick up at rock bottom and keep on hand. The best pricing is a discount store’s sales, but if not an option, know the lows at your grocery. Compare pricing by pound or ounce.
- In many grocery stores, sliced cheese is pricier than block cheese; at Lidl, it’s typically the same, and at Aldi, it’s less.
- Brand-name American cheese is typically more expensive than other basic cheese slices, and store brands are often noted for not melting as well.
- Cheese keeps for weeks, unopened, and can be frozen. After freezing, it will be a little crumbly but still great for casseroles and cooking.
Bread Crumbs:
- Make don’t buy bread crumbs. They can be frozen fresh or toasted. Not only does it prevent waste, but it’s easy and saves money.
- Toasted works well when coating or topping an item; fresh are generally used in a mixture.
Chicken Cordon Bleu with Supreme Sauce
Chicken Cordon Bleu

- Prep Time: 40 minutes + rest time
- Cook Time: varies
- Total Time: 1 hour active time, but takes much longer
- Yield: 4 servings 1x
- Category: Main Dish Chicken
- Cuisine: French
Ingredients
- 4 chicken breasts, 6 ounces each
- 8 slices ham, thinly sliced
- 6 ounces Gruyere or Swiss cheese, grated
- 1/2 cup flour
- 1 cup toasted bread crumbs
- 1/4 teaspoon dried thyme or marjoram
- 2 eggs
- 2 teaspoons water
- salt and pepper as directed in recipe instructions
Instructions
Preparing the Breast:
Slice each chicken breast from the fat side, almost to the middle. As you near the edge, with about an inch left, open it up. Trim the pointy bottom off and make a series of small, shallow cuts vertically along the fat middle portion. Do not cut through the chicken.
Place in a heavy Ziploc or between two sheets of plastic. Using the fat size of a meat mallet, gently pound chicken to 1/4 inch thickness; when pounding, coax the chicken into something resembling a rectangle. Season with salt and pepper.
Fill and shape the Chicken:
Leaving a half-inch edge around the breast, with a little more space on the long edge furthese away, place two slices of ham. Add grated cheese. Bring the bottom of the chicken towards the ham and cheese, beginning the roll, while bringing the two sides in, folding and rolling. Turn to place the seam at the bottom. If any ham or cheese is sticking out, unroll and poke them in so that when the roll is complete, you have chicken sealed against chicken.
Squeeze the log gently to seal. Lay a piece of plastic wrap down and place your chicken log on the plastic, seam side down, horizontal to the bottom edge of the plastic. Roll the plastic wrap around the chicken, leaving the short sides of the chicken roll open.
Grab a hold of the plastic wrap to the left and right of the chicken, one end in each hand. Firmly roll the chicken on the counter, letting the plastic wrap tighten. Pick it up and roll again several times. The plastic will tighten around the chicken, forcing it into a nicely rounded and uniform shape. Refrigerate for at least an hour and up to overnight – this helps to seal the chicken well.
If you wish to freeze this as a make ahead meal, do so at this point. Thaw overnight in the fridge and continue with the recipe.
Prepare flour, egg wash, and breadcrumbs:
In three dishes of appropriate size for the rolled chicken, prepare the three step breading process. Add flour to one and season with salt and pepper. In the second, beat together eggs and water, the mixture should be fluid. In the third, mix the breadcrumbs with thyme, salt, and pepper. Set out a rack for the breaded chicken.
Lightly dust the chicken with flour, making sure the ends are coated. Pat gently to shake off excess. Dip and roll in the egg mixture, again taking care to coat ends; let excess drain off the roll. Finally, place in the bread crumbs, completely coating. Press gently to adhere. Place on rack and refrigerate for at least an hour for best adhesion.
Bake, Fry, or Deep Fry:
Bake at 350 for about 20 – 25 minutes, deep fry at 350 for about 6 – 8 minutes, or pan fry in about 1/2 inch of oil, four minutes per side. Test for a temperature of 160 to 165 degrees. 165 is the safe temperature for chicken, a short rest, if removed at 160 degrees and lightly covered with foil, should raise the temperature to 165 without overcooking the chicken.
Nutrition:
Per Serving (excluding unknown items): 371 Calories; 20g Fat (48.4% calories from fat); 33g Protein; 14g Carbohydrate; trace Dietary Fiber; 120mg Cholesterol; 420mg Sodium. Exchanges: 1 Grain(Starch); 4 1/2 Lean Meat; 1 Fat.
