The Juicy Lucy (or Jucy Lucy), the iconic cheese-stuffed burger, is a Minnesota thing, you betcha! Two rival Minnesota bars, Matt’s and the 5-8 Tavern, have been making these for decades, but recently, the Juicy Lucy has gone all gourmet. There’s something about a great, crusty burger with an ooey, gooey, cheesy filling that puts all other cheeseburgers to shame. This Juicy Lucy Ultimate Cheese Stuffed Burger definately does.

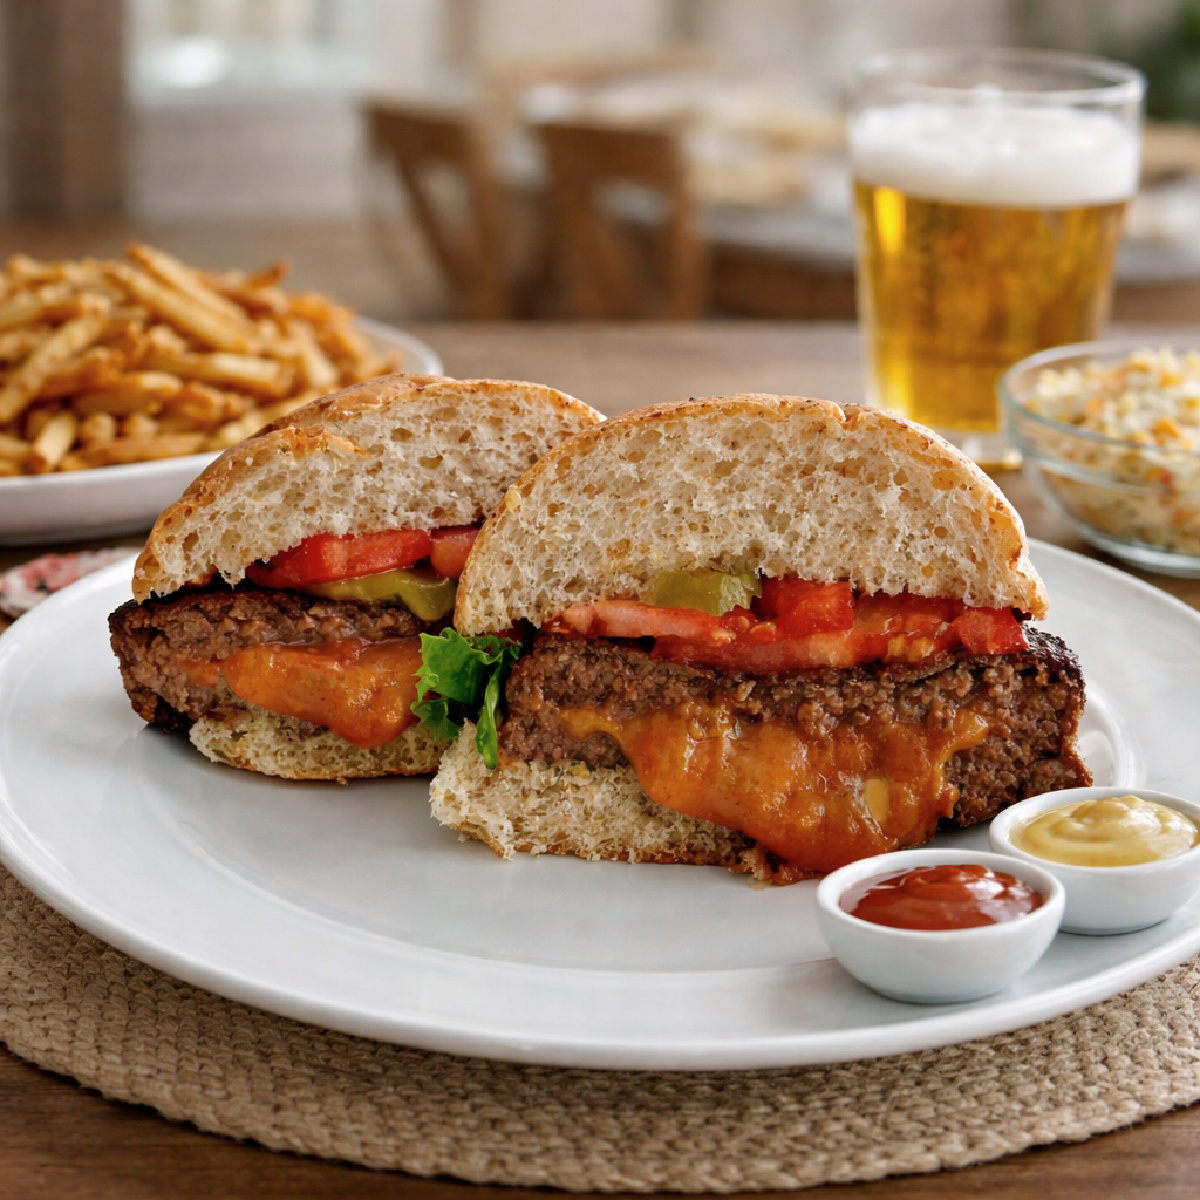
Juicy Lucy Ultimate Cheese Stuffed Burger

While Juicy Lucys and various Minnesota restaurants that make them have been featured on several shows, I credit Food Wars and Diners, Drive-Ins and Dives for their recent popularity. Guy Fieri has featured The Nook and the Blue Door Pub on his show; both restaurants do upscale versions, and now the word is out!
About The Juicy Lucy Ultimate Cheese Stuffed Burger:
Here’s how to make a great one right at home, from a Minnesotan, with all the tricks and tips you need to know. I’m going here: these are BETTER than any of the restaurants mentioned above. I know coz I’ve tried them all. You can’t beat the care you can put into your own.
Plus, the cost to make yours at home is a pittance of what you pay when eating out. These are big burgers, and one thing is for sure: no one will want seconds. I chose this size because these are best made with a fatty ground beef, and with shrinkage, they’ll fit perfectly on a bun. And also because I wanted to do justice, and these are insanely good.
Below, you’ll find everything there is to know about how to make a perfect Juicy Lucy, full of cheese, with no blowouts – that’s when the cheese has leaked out of the burger. (I’ve even had blowout burgers at two of the restaurants named above. A Juicy Lucy with no cheese is a huge disappointment.
What to Serve with the Juicy Lucy Ultimate Cheese Stuffed Burgers:
So of course, we have to decide what else is on the menu! For a burger like this, frozen fries just don’t make the cut! Maybe you’ll want my Stupid Simple French Fries or my crispy Stupid Simple Sweet Potato Fries. Even easier to pull off at home are these Baked Potato Wedges.
If you’re going wild, maybe make my Vidalia Onion Rings with a Chili Lime Dipping Sauce. They’re restaurant quality, and by that, I mean a good restaurant! And if you don’t have Vidalia Onions, make them with Spanish onions, the common onion variety you’ll find in the store.

Crispy Beer Battered Vidalia Onion Rings
Making The Juicy Lucy Ultimate Cheese Stuffed Burger:
If you think I’m being picky and persnickety in the directions, you’ve probably never had your stuffed burger leak. That’s a huge bummer.
At home, you’re likely to make just enough burgers (coz no one really wants a leftover burger), so if someone gets that one Juicy Lucy, where the cheese leaked out, it’s too late to remedy. A Juicy Lucy is nothing w/o the ooey, gooey oozing cheese.
Rolling your burger into a ball, stuffing a chunk of cheese in, and flattening it out is a recipe for disaster! Take a little care and do them right the first time; after forming the first one, you’ll see how easy it is, and it will speed along much faster!
The Beef & Cheese:
Use 8 ounces of ground beef and 1 to 2 ounces of cheese per person. Use a good, fatty ground beef, 75 to 80 percent. It minimizes the chances of leakage and let’s face it, you’re eating a half-pound of beef with a couple of ounces of cheese – why worry about health at this point, eh?
And don’t use a compressed tube of beef. It’s hard to work with, prone to leaking, and just isn’t the quality you’ll want for these premium burgers.
Handling The Beef:
First of all, be gentle. Coax the beef and don’t overwork. Don’t put any seasonings in the beef itself, you’ll be risking, dare I say it? Premature ejaculation of the cheese if you’ve handled your beef to that level.
Use plastic wrap (consider recycling and using a plastic bag) to facilitate forming and moving the burger to avoid any cracking. See the photos below. Don’t smash down the middle or dent it after it’s formed, and whatever you do, do NOT smash it in the skillet as it cooks.
Forming the Burger for your Juicy Lucy:
Grab an eight-ounce ball of beef for each burger, divide it into two balls on a layer of plastic wrap, leaving a bit of space between each. Gently flatten with your fingertips, working from the center out, pressing the center with a bit of pressure until each patty is about 5 1/2″ round.
Leave the edges alone for now. In the photos, you’ll even see dents from my fingers & see I didn’t absolutely “smash” it. I worked it just enough to make sure there were no holes or cracks. Really, I almost “nudged” it into the round shape. Do the same for the top of the burger
.
Season with salt & pepper or whatever you want, add the cheese on top of one patty, breaking or folding corners in as necessary to leave an edge free of cheese all around. There should be a bit more cheese in the center than toward the edge.
Put the two patties together by using the plastic as an aid to place the non-cheese patty on top of the cheese patty and pinch, almost crimp, the edges together.
There will be a hump in the middle; leave it alone. Instead, smoosh the crimped edges up to the level of the top of the mound by gently pushing all around the sides of the burger with the curved palm of your hand and patting with the other. As you do so, you’re bringing the edges up to the height of the center.
Inspect for any holes or cracks, top, bottom, and sides! This is important: smooth them over with a fingertip if there are any.
You should have a burger about five inches across and an inch tall (and yes, I measure, at least the first one), and it will shrink about another half an inch as it cooks.
At this point, the burger has straight sides, gently round them off with your fingertips if you wish; I leave mine alone. The less you handle your Juicy Lucy, the less risk of leaks.
Cooking Your Juicy Lucy:
Heat your cast-iron pan (or another type of skillet if you must) or griddle over medium-high heat until it’s nearly smoking. Toss in a ridiculous amount of salt, about a teaspoon (don’t worry, most of it won’t be on your burger; it acts as a barrier between the beef and the skillet, draws out some of the moisture from the beef so the crust forms nicely, and helps prevent sticking), and add your burgers.

Salt pan, about a teaspoon – don’t worry it won’t all be on the burger!
Use the plastic the burgers are sitting on to gently turn your burgers in the pan. If you’re making several, you may need to use more than one pan.
Turn the heat down to medium and let it sit for about six minutes – the burgers should be brown halfway up when looking at the side. Turn down the heat if they are browning too fast. If they aren’t browning, leave them until they are. If they aren’t cooking evenly, don’t move the burgers and disturb the crust; move the pan around on the burner!
When ready to turn, add a little salt to the still raw top, and preferably, using a thin metal spatula, not a thick plastic one, turn the burgers and cook for two to three minutes longer, to your desired doneness.
You’ll begin to see the fat from the burgers oozing out when it’s done. If you see (or smell) cheese oozing, remove the burger immediately – turn it so the oozy side faces up. The more well-done the burger is, the greater the risk of leakage.

Juicy Lucy – So important to rest before cutting!
Resting your Juicy Lucy Ultimate Cheese Stuffed Burgers:
Let your Juicy Lucy rest for several minutes, lightly covered. You might not see this at a restaurant because the burger cools a bit as it waits to be delivered to the table. But still, you’ll get a warning from the server to wait for a minute or two.
Resting is important for the usual reasons, but also because the burger is full of molten hot cheese. When picking up and holding the burger, be careful not to squeeze it hard; that could create enough pressure to cause the hot, hot cheese to spurt out.
Fillings, Add-Ins & Toppings:
The key here is to use just a little, not a lot, of filling. Too much filling, especially cheese, can cause blowouts during cooking or issues with that first bite spurting molten cheese everywhere.
Inspirations: The sky, or your imagination, is the limit. Look at a restaurant menu if you run out of ideas! Here’s the Blue Door Pub Menu, and here’s The Nook’s Menu. I like about 1 1/2 ounces of cheese and/or a few add-ins!
The Cheese: Any cheese works, although those that get melty and oozy are best! A first choice? Good ol’ American. A good (not a grocery store package of crumbles) Bleu Cheese or Feta are tasty, but even meltier cheeses like Provolone, Swiss, Muenster, Gouda, Jack, Cheddar, or Colby are better. Goat cheese is great with the right add-ins.
Add-Ins: Some fun add-ins are Green Chiles, Roasted Red Peppers, Olives, Jalapenos, Carmelized Onions, Shallots, Bacon, Sun-Dried Tomatoes, and Mushrooms, just to name a few!
Saving Money on The Juicy Lucy Ultimate Cheese Stuffed Burger:
Check out Aldi or Lidl when they often have their ground beef on sale – don’t use the chub packs; they have beautiful ground beef in the refrigerator section, and don’t forget to pick up your “fancy” cheese there.
It’s always a bit hit and miss, but they have some great prices.

Juicy Lucy Ultimate Cheese Stuffed Burger – never cut, but I wanted to show the cheese!
The Juicy Lucy Ultimate Cheese Stuffed Burger

- Prep Time: 10 minutes
- Cook Time: 8 minutes
- Total Time: 20 minutes
- Yield: varies, one per person
- Category: Beef Main Dish
- Cuisine: American
Ingredients
- 8 ounces ground beef per burger
- 1 to 2 ounces (slices) of cheese per burger
- Enough buns for the number of burgers.
- Any add-ins or condiments desired
Instructions
Use the photos below as a guide.
Assembly:
Take an 8-ounce portion of ground beef per burger, and divide in half. Place each mound on a sheet of plastic (to help with gently transferring the beef patties) with several inches of space between them.
Gently form each mound of ground beef into a loose ball and gently work each half by pressing down in the center, pressing just barely firmly, working toward the edges, and forming two 5 1/2 inch circular burgers. Make sure there aren’t any cracks or holes in the center of the burger. Leave the edges alone for now.
Season the burger with salt and pepper as desired. (Note: my preferred method of cooking is to use salt in the skillet, so go easy on any salt inside the burger.) Add the cheese to the center of the burger, breaking or folding cheese to leave a perimeter of cheeseless ground beef around the edges. Add any broken pieces of the cheese to the center. There should be more cheese in the center than along the outside edges of the cheese.
Use the plastic wrap as an aid to lift the second, cheeseless burger up and flip it on top of the burger. Go around the outside edges of the burger and tightly pinch the edges together. The center of the burger at this point will have a hump. Leave it alone.
Instead, smoosh the crimped edges of the burger up to the level of the top of the mound. Using the palm of your hand, curved around the burger, push and pat the edges of the burger, pressing them in so the burger is an even height all around. Your burger should be about 5 inches at this point, and the sides will be straight and about an inch tall, and the top will be even.
Inspect the burger and, with a fingertip, smooth over any cracks on the burger; see the photos. Any cracks can form a leak, later, as it cooks. Round off the edges as desired.
Cooking:
Heat your cast-iron pan (or another type of skillet if you must) or griddle over medium-high heat until it’s nearly smoking. Toss in a ridiculous amount of salt, about a teaspoon, and add your burgers. Use the plastic the burgers are sitting on to gently turn your burgers into the pan. If you’re making several, you may need to use more than one pan.
Turn the heat down to medium and let it sit for about six minutes or until the burgers are brown halfway up when looking at the side. Turn down the heat if they are browning too fast. If they aren’t browning, leave them until they are. If they aren’t cooking evenly, don’t move the burgers and disturb the crust; move the pan around on the burner!
When ready to turn, add a little salt to the still raw top, and preferably, using a thin metal spatula, not a thick plastic one, turn the burgers and cook for two to three minutes longer, to your desired doneness. You’ll begin to see the fat from the burgers oozing out when it’s done. If you see (or smell) cheese oozing, remove the burger immediately – turn it so the oozy side faces up. The more well-done the burger is, the greater the risk of leakage.
Resting:
Have your buns and all your toppings ready. Now the most important part – let your Juicy Lucy rest for about two minutes, lightly covered, keeping in mind they are full of molten hot cheese. As you hold the burger for that first bite, don’t press down on it firmly. You don’t want to create a lot of pressure and inadvertently cause the burger to blow out, spurting hot, hot cheese everywhere.
The Method in Photos:
Any odd coloration is from bad lighting! Sorry!
________________________
Since it’s Memorial Day weekend and we’re facing rain, I’ll be making Juicy Lucy Ultimate Cheese Stuffed Burgers indoors. No one is going to miss the cookout when I serve this regional specialty!

66 thoughts on “Juicy Lucy Ultimate Cheese Stuffed Burger”